
The Gila is widely regarded as one of EVE Online’s premier PvE cruisers, combining Guristas pirate faction bonuses to shield resistances, kinetic and thermal missiles, and massive damage and hitpoints for two medium drones. Thanks to its six medium slots and effortless damage projection, it excels across a wide range of solo content, From the searing storms of Abyssal Deadspace to the chaotic battlefields of Level 4 Missions, the Gila doesn’t just survive; it thrives, making it arguably the most versatile and Powerful PvE cruiser in New Eden.
In this guide, we will explore two specialized PvE setups tailored to your combat goals: a High-DPS Build engineered to maximize drone and missile output for fast site clearing times, and a Tank Build designed to push the hull’s formidable shield defenses to the limit for surviving heavy incoming fire in high tier encounters
Essential Skills for Gila Pilot

Before you invest hundreds of millions into this magnificent machine, you must ensure your capsuleer skills are up to the task. The good news is that the Gila, thanks to its powerful role bonuses, is remarkably effective even with modest skills. However, to unlock its true potential and tackle high-tier content, a focused skill plan is essential.
Required Skills To Fly it
| Skill Name | Target Level | Training Time |
|---|---|---|
| Caldari Cruiser | Level II | 3h 55m |
| Spaceship Command | Level II | 47m |
| Caldari Destroyer | Level III | 8h 53m |
| Caldari Frigate | Level III | 8h 53m |
| Spaceship Command | Level I | 8m |
| Gallente Cruiser | Level II | 3h 55m |
| Spaceship Command | Level II | 47m |
| Gallente Destroyer | Level III | 8h 53m |
| Gallente Frigate | Level III | 8h 53m |
| Spaceship Command | Level I | 8m |
| TOTAL QUEUE TIME | — | 1d 20h 12m 10s |
Recommended Skills Level for Efficiency
- Drones (V): The cornerstone of your damage. This skill increases the number of drones you can control and is essential for fielding your two powerful medium drones alongside a flight of lights or salvage drones.
- Light and Medium Drone Operation (V): Each level provides a 5% damage multiplier per level to their respective drone types. Reaching Level V is critical for maximizing your primary damage output.
- Drone Interfacing (V): This is where your damage truly soars. Each level provides a 10% increase to drone damage, making Level V a massive 50% bonus to your base drone DPS.
- Missile Launcher Operation (V): Supports your secondary weapon system.
- Rapid Launch (V): This skill serving as one of the most critical direct DPS upgrades for any missile-focused pilot.
- Shield Management (V) & Shield Operation (V): These skills directly increase your shield hitpoints and regeneration rate, forming the bedrock of your passive tank.
- Tactical Shield Manipulation (IV): Reduces the delay before your shield begins to recharge after taking damage. For passive tanks, this is invaluable.
- CPU Management (V) & Power Grid Management (V): The Gila can be tight on fitting, especially with tech II modules. These skills give you the breathing room you need for an optimal fit.
- Afterburner (IV): For most PvE applications, an Afterburner is preferred over a Microwarpdrive for its lower signature radius and capacitor usage, helping you speed-tank incoming fire.
Two Builds for PvE

The Gila’s incredible flexibility allows it to excel with different fitting philosophies. Below, we detail two of the most effective and popular builds: the beginner-friendly Passive Shield Tank and the advanced, high-damage Active Shield Tank.
High-DPS Gila Build
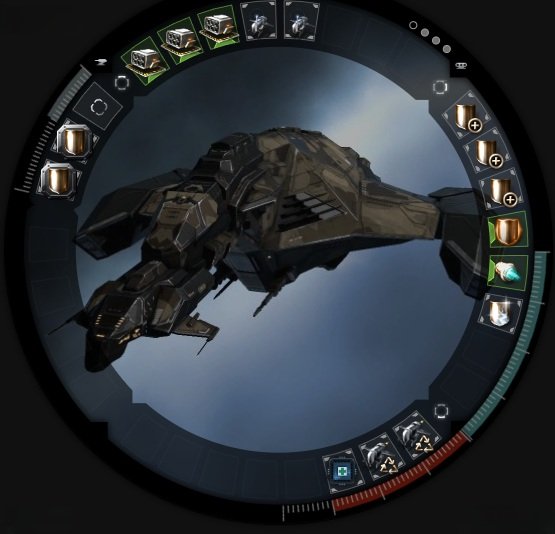
This build is the cornerstone of the Gila’s fame. making it perfect for solo pilots, those new to the ship, or anyone running long sites without station support. Its capacitor-free operation means you can stay on the field indefinitely.
 Large Shield Extender II (LSE)
 EM Shield Amplifier II
 Medium Core Defense Field Purger II (boosts passive recharge)
 Medium EM Shield Reinforcer II (patches the weakest shield resist)
 Warrior II (for fast frigates)
Tank Build
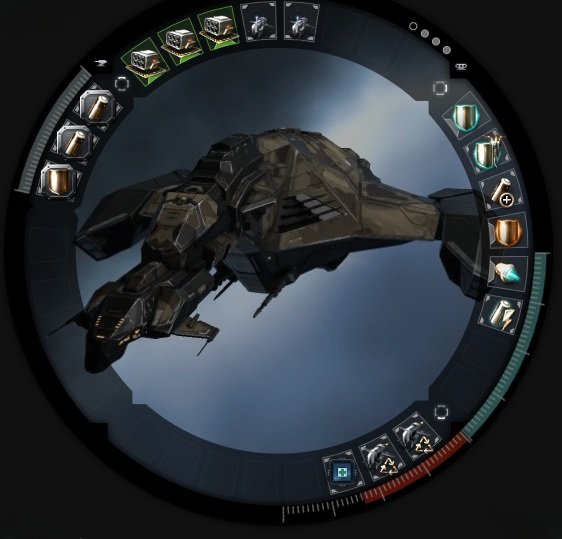
For pilots seeking to maximize clear speed and tackle the most demanding content like high tier Abyssal Deadspace, this fit delivers explosive damage at the cost of a more active piloting style and capacitor dependency.
| Slot | Module | Specific Recommendation & Reasoning |
|---|---|---|
| High (5) | Missile Launchers | 3x  Rapid Light Missile Launcher II |
| Utility Highs | 2x  Drone Link Augmentor I | |
| Mid (6) | Shield Booster | 1x  Large Shield Booster II (the core of your active tank) |
| Shield Boost Amplifier | 1x  Shield Boost Amplifier II (dramatically increases LSb efficiency) | |
| Cap Battery | 1x  Medium Compact Pb-Acid Cap Battery (for stability) | |
| Hardener | 1x  Multispectrum shield hardener II | |
| Propulsion | 1x  10MN Afterburner II | |
| Utility | 1x  Cap Recharger II | |
| Low (3) | Damage Mods | 2x  Drone Damage Amplifier II |
| Core Defense | 1x  Damage Control II | |
| Rigs (3) | Capacitor | 2x  Medium Capacitor Control Circuit II |
| Defense | 1x  Medium Thermal Shield Reinforcer II (or other damage-specific rig) | |
| Drones | Primary Damage | 2x  ‘Augmented’ Hammerheads |
| Secondary | A mix of light drones for different damage types and ranges |
Final Thoughts
Gila is a ship that does not let go, grinding down its opponents through a combination of relentless, swarming DPS and a tank that simply refuses to break. It is a testament to Guristas ingenuity, taking a Caldari design and forging it into something uniquely powerful and brutally effective.